Saturday, January 18, 2014

Downside to an Old House

One of the downsides to living in a really old house--or maybe just this house in particular--is the lack of storage space in the kitchen.  It's not a small kitchen, don't get me wrong.  It's actually quite big, and there's a narrow pantry off the kitchen which has a second, deep sink, dishwasher, and more cabinets.  The kids think it's funny when I ask them to fetch something from the 'other kitchen' or sometimes 'the little kitchen'.  My father thinks it's weird that I don't just call it a pantry, but that's how we roll.

But regardless of how much storage we should have in a kitchen this size, the point is that we actually don't have much at all.  We have one - ONE! - upper cabinet.. and it's half-sized at that.  We do have a really tall pantry-type cabinet (about 18" wide), but the problem there was that even though it's six or seven feet tall, there were only two shelves in it.  Great use of space, right?  As far as bottom cabinets go, we have three regular cabinets, a narrow cookie-sheet type cabinet, a half-size cabinet, and a weird cabinet in front of the chimney which is about the depth of a medicine cabinet.  Oh, and one of those pull-out ones that can hold cans.  Oh, and the obligatory under-the-sink cabinets.

We're coming from a house that, despite its many imperfections, had an enormous amount of cabinets.  Seven full size upper cabinets, plus the cabinets above the fridge and microwave.  Four big lower cabinets, plus a stack of drawers in place of another cabinet.  Oh, and a ton of counter space, too.  So we're kind of floundering here.  We got some MDF cut to make extra shelves in the tall pantry cabinet, that was a no-brainer.  But there's nowhere to store our dishes, about half the food storage we're used to, and our big-ish appliances are vying for space with our pots and pans.  We managed to find space in a cabinet for the crockpot and the food processor, but the toaster oven, Keurig, and stand mixer are all squeezed onto a counter that's about 24" long.

We did come up with a few solutions.  Next to the window in the little kitchen is wide open wall space.  Why they didn't put a cabinet here, I don't know.. but we put shelves.  We tossed almost all of our mugs and miscellaneous cups, bowls, and plates.  Bye-bye, sippie cups!  This is pretty much it for our dishes now.  (Okay, I stashed some extra bowls and our Disney mugs on the top shelf of the tall cabinet).  I actually really like the pasta/rice/etc in nice jars, it looks cool.  The problem there is that I have to get a step-stool if I want anything from that shelf.


One of our other problems was storage for our spices.  We have a lot.  Who doesn't, right?  Anyway - this is our one upper cabinet.  It's next to the stove, so it seemed like a perfect place to set up one of those magnetic under-the-cabinet spice thingies you see on Pinterest.


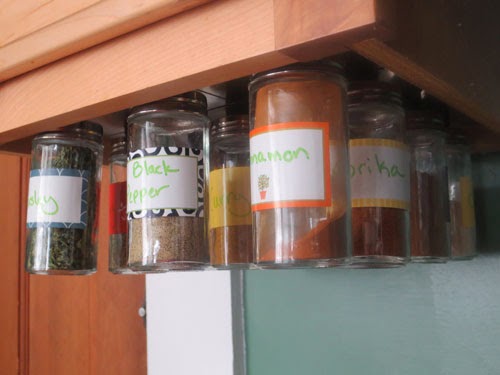
I could say that we did it perfectly on the first try.  I don't have to tell you how the metal we glued to the bottom of the cabinet wasn't magnetic, or that one magnet wasn't strong enough to hold up a full spice jar (we tried on the underside of the microwave, since the metal isn't magnetic).  I also don't have to tell you that when I hot-glued magnets to the metal, so the magnets on the caps would have something to stick to, that I didn't account for the polarity and that most of the bottles insisted on facing label-side-in.

Nope, I did it just right on the first try.

Friday, December 27, 2013

The Raum Homestead Has Moved!

Well, we finally did it.  The weekend after Thanksgiving, we packed up the house and moved about 50 miles north, to Berwick, Maine.  It's a rental - we decided that it would be better to try out the area and the type of house before committing to a purchase.  Our new home is a old farmhouse, built in about 1880.  There's a huge barn, and it's sited on 13 acres.  We're right off a busy road, which is good for now but something we'll try to avoid when we buy.

But boy, does this house have character!  I've never lived in a house this old and while I loved the idea, I wasn't sure how much I'd like it in practice.  It's only been a month, but so far I love it!  The kids think it's fantastic, too.  They love the double stairs, the little nooks and crannies, and they can't wait for the spring so they can explore the property more.  For right now, they're having fun sledding down the hill right next to the driveway.

One of the very first things we did was get our Christmas tree.  Traditionally, we decorate for Christmas during Thanksgiving weekend, and I didn't want to let our move shorten our holiday season.  We compromised by going to a local tree stand and choosing a pre-cut tree - poor Doug was too exhausted and sore from moving everything.


You can see the wide plank floors in that shot.  They're throughout the house, but covered up in some of the rooms.  They're exposed in the living room, master bedroom, the landing off of the littles' room, and the boys' bedroom.  In the living room, you can see through to the basement between some of the boards.  The living room floor is pretty beat up, but the floors in the bedrooms are shiny and so smooth to walk on.  Here's a close-up from the living room:


While we're at it, let's look at some other Christmas decorating.  I'd always wanted a staircase that I could put a garland on, and here we have one!  Unfortunately, Niall loves picking the berries off of it.  I find them throughout the house.


We put a tiny, very cheap, fake Christmas tree on the landing outside of the bedroom that Fiona and Niall share.  It's actually a pretty big space, and we have all the toy kitchen stuff set up there.  It works well because all of Fiona's dolls and their dress-ups are in their bedroom.  Anyway, we got the little star and the skirt from Target, and picked up their Disney ornament advent 'calendar'.  The ornaments are little tins with Disney characters on them, and we filled them with candy to share each night.  The door in the picture is the walk-up attic.  Love it so much more than our old attic with its creaky ladder.


Here's a quick picture of Niall's bed.  They both have a lot more blankets on their beds now, as the room is pretty cool.  The thermostat is in our room which is always warm, and I think between that and the (poorly insulated?) skylight and being tucked under the eaves makes for a chilly room.  The first night we were tucking them into bed, Fiona was checking out the walls.. she said, "Mom, why is the ceiling dripping?"  I guess it does look like the ceiling is dripping down onto the walls.


The house has got all these cool, old touches, like this doorknobs throughout.  I wish our landlord (or whoever) had been a little more careful when painting, but oh well.


And next to the kitchen door is this old timer.  The property used to be a working farm, complete with a spot-light-lit sign out front.  We think this old timer went to those lights.  For now, we just set our keys on top of it.


It's pretty funny.. if you Google our address, you find old photos of people having sleigh rides here and stuff.  The barn is cool but kind of depressing.  The stalls still have names over them, and it makes me wonder about the people (and animals) who lived here before.  There's no escaping the history of this house.  Here's the view from the window above our kitchen sink:


We're still settling in and getting used to the area, but so far we love it.  It's a little hard on us only having one car because during the week, we're either stuck at home or stuck back in Massachusetts if we drive Doug to work.  I'm really looking forward to getting to explore the area more, though.

Monday, September 2, 2013

Indoor Gardening

Over this past spring and summer, I've come to realize how much I benefit from being outside and connecting with nature.  Just sitting out back on the deck watching the kids play is great, but actually interacting with nature - walking barefoot in the grass, lying under the tree and looking up at the branches, tending to our garden, making our yard attractive to wildlife - that brings things to a whole 'nother level.  I'm a much happier, more sane person when I can do those things.

Unfortunately, we live in Massachusetts, and those opportunities are rapidly running out.  To be honest, I'm a little apprehensive about this winter and being shut off from anything green.  So I started searching Pinterest and the Google for information about houseplants and indoor gardening.  I've tried having some house plants before, but it's never worked out too well.. mostly because of a lack of information on my part.  This time, I'm vowing to do it right and not just wing it.

I took the kids out to Kanes, a local nursery that's like the Walmart of nurseries.  But you know what?  Everything I've ever gotten there has done really well.  We had a blast in the greenhouse picking out plants and admiring the sleeping kitties tucked away in little nooks.  And we came home with these beauties:


Check out the texture on that Pilea!  How cool are those leaves?


And look at the gorgeous green and pink foliage on the Fittonia!  It almost reminds me of watermelon.  So pretty.


And look at the leaf on this.. plant!  Yes, I lost the little plant label thingy.  Oh, had I tricked you with my clever plant-name-dropping?  Well, hey.. whatever its name is, it's lovely.


I got the Aralia mostly for height, but its leaves are variegated, too, so that's a bonus!  It looks so delicate.


We also grabbed some potting mix (nothing organic here, since we're not eating any of these babies) and some horticultural charcoal, since there won't be any drainage holes in the planters.


You may have noticed the aloe off to the side in the group shot.  I had plans for other plants to be grouped together in a giant glass terrarium, but the aloe has different needs so I picked up this cute little planter from Michael's.  I want plants in each room, and I figured aloe is perfect for the kitchen.


I filled the bottom with some charcoal...


Put my aloe in, packed some potting soil around the edges, and voila!  Isn't she lovely?  By the way, yes, I was doing this all on my dining room table.  These plants all need to stay out of direct sun and I figured if I brought these all outside to plant, I'd probably get pulled away (hello, four children!) and leave them out there too long.


Now for the terrarium!  Eee!  I have to say, this project was a little more fidgety and difficult than I was expecting.  Step one:  pour charcoal into giant glass terrarium.  Step two:  clean the glass.  And again.


Once the glass was somewhat clear of dust, I put a layer of potting soil down and set my plants inside.  It became apparent right away that one plant (the mysterious nameless one) was not going to fit.  They look so tiny in the greenhouse, but huge inside the terrarium!


After the plants are in place, then fill in with potting soil around the edges and in between the plants.  You don't want to put in a ton of potting soil first and try to dig holes, that just wouldn't work.  Not that this way was a piece of cake, but still.  Once everything is firmly planted, get out your sheets of moss.  Wait, you don't happen to have sheets of moss just lying around your house?  You can get this stuff at Michael's and AC Moore.


Tear off pieces and cover up the bare soil sort of like you'd use mulch.  You'll probably need to wet it to get it to stay put - I did.  If you have some little pebbles or rocks, you can add those for decoration, too.  You should end up with something like this:


Okay, so I may have gotten a little tired of trying to clean the glass, and there might still be some smudges of soil on it.  But isn't it beautiful?

Friday, August 30, 2013

For The Birds

My plan was to write about house-hunting, how we're getting ready to move from northeastern Massachusetts to southeastern New Hampshire (which is not a big move, obviously).  I was going to talk about some of the cool houses we've seen, features we like, etc.  Then I took a picture of the birds at some of my bird feeders, planning to illustration how important the outdoors is for us, and the direction of my thinking went totally off track.

Here are the bird feeders on our second-story deck.


We've had feeders here for a while, and I always get so much enjoyment out of them.  The slider to the deck is in our dining room, and there's nothing like watching the birds and squirrels eating while we're eating, too.  Watching and caring for the birds always makes me feel connected to my grandmother, and I find that so soothing.

Of course, we have some other family members who also love watching the birds, but probably not for the same reasons.  Here's our 11 year old lab mix, Madison.  She doesn't care too much about the birds, but she loves the squirrels.  And with her is Moxie, who's about a year and a half old.


I tried to get a picture of Moxie's brother, Milky Way, but he was not cooperative.  This was the best I could do.


The 'older' cat is Indy, he's four and Colwyn's 'son' - and he's such a grouch.  But we still love him.


Thursday, August 29, 2013

Print Wall Art

In my quest to update my decor - which hasn't been updated in at least ten years (...I feel old) - I stumbled upon this picture on Pinterest:


It's from Blue Cricket Design and she gives a great tutorial on how to make it.  I loved the idea and naturally had to try it - with my own modifications.

First, I found an old damaged book.  In this case, it was a Pippi Longstocking book that Niall had ripped the cover off of.  I pulled out a bunch of pages and made sure all the straight edges were interestingly torn.


Then I mod-podged them to my canvas.  Spread a bunch of glue in one area, put down a page, and mod-podge over that.  Rinse and repeat until the canvas is totally covered.


In the tutorial, she used some magazine cutouts of birds and drew the branches and leaves by hand, then colored over it all with sharpie.  Obviously it looked great, but I wanted to use my Silhouette craft cutter instead.  I got to mess around with the design a lot without drawing all over my canvas, and then once it was cut, I just had to glue it down, and seal it with more mod podge.  I made sure to include a cardinal, as a nod to my grandmother.


I think it came out really well.  Unfortunately, I can't take a nicely staged picture of it because my house is a mess.. but you get the idea.

Wednesday, August 28, 2013

Sewing Fun

Last year, I sewed a bunch of nightgowns for Fiona as one of her Christmas gifts.  She loves nightgowns but only had a few old pill-y fleece ones.  I found an awesome and incredibly easy tutorial for a raglan dress at Ikatbag.  When I say it's easy.. it's really, really incredibly easy.  I did modify the pattern a bit for her nightgowns - made the sleeves full length, and shirred the neck instead of using an elastic casing.  She loves them, though, and they're so cute!

Well, for her birthday (yes, back in June), she got Bitty Twins but the clothing - oy!  American Girl Doll stuff is incredibly expensive.  She got an extra outfit for each doll, but no pajamas.  I promised I'd make her some.. and finally, three months later, I got around to it.  Well, for the girl doll.. I haven't done the boy's yet.


I used the same pattern and just trimmed it a bit.  Well, a lot.  But anyway, I got it done in about 45 minutes.  Not bad, huh?

Then I happened to find some fabric I bought for her last fall, planning to make a dress.  I'd forgotten all about it!  She's grown a fair bit so I didn't have enough to make a dress, but I was able to make an adorable tunic using the same raglan dress pattern.  It took me about an hour this time.  She's been wearing it all day - with a skirt, which looks a little goofy - I meant for her to wear it with leggings, but it's pretty warm out.


Here's a close-up of the shirring.


It's just so damn cute!  I get the feeling she's going to have many more of these dresses in her fall wardrobe.  I love the raglan style and the option of doing different colors for the sleeves.  I also want to try doing some different sections of fabric on the skirt, sort of like her princess twirly dress.

Wednesday, July 3, 2013

Mill Brook Meadow Park, Rockport

Colwyn and Lachlann started an art class today with some fellow homeschoolers.  This is the first time they've done a real drop-off class, so we were all excited.  The teacher, a local artist, was very nice and her home is knock-your-socks off gorgeous.  Now, I'm not going to say that as soon as I got home, I looked up her street on Zillow (because in reality, it was about two hours later), but these are all well-over-two-million-dollar houses.  Boy, did I feel out-classed!  Seriously, though, the teacher was so nice and down to earth, and the boys had a great time.  I'm sure it also helped that their classmates are all good friends of ours.

While the boys got their art on, the littles and I (and the other mommies and their littles) tried out a new park.  It's called Mill Brook Meadow Park in Rockport, and it's a very good thing I spent a ton of time on Google Maps trying to figure out where it is, because it's really tucked away.  But this park is amazing!  There's a quaint little picket fence at the entrance, and just inside is a gorgeous English garden.  This little picture of Fiona and Niall doesn't do it justice because they weren't cooperating, but oh.. so beautiful.


Look at this lovely hydrangea.  Blue hydrangeas are right up at the top of my list of favorite flowers.  Oh, other interesting note.. the artist's street was just filled with blue hydrangeas.. some purple, too.  The kids said it should be called Blue Hydrangea Street.


Given that the name of the park is Mill Brook Meadow, you'd be right in assuming that there's both a meadow and a brook.  The brook is overflow from a pond at the far end of the park and was running fairly high today.  It goes the length of the park and includes some areas bordered with rocks, one area where it widens into a small lily pond, and some 'rapids' that the kids loved.


That little sign in the above picture states that the Rockport Garden Club is trying to eradicate two invasive species of plants and includes pictures.  Goodness.  There are two wooden bridges and a stone bridge over the brook, leading to little nooks and paths that give it a very "Secret Garden" feeling.  There were lots of butterflies and dragonflies flitting around.


We all agreed that the bridges would be a great spot to play "Pooh Sticks" and we thought that next time, we could bring little boats to race downstream.


I read online that there was some playground equipment there - that turned out to be a slide and three swings, which was more than enough given all the natural play areas.  Niall definitely liked the slide.


Across from the playground is a public beach that boasts the cleanest bathrooms I've ever seen.  There are inns all over the place and Bearskin Neck is a relatively short walk away.  But right next to the park is a little place called  Nate's at Front Beach that serves breakfast and lunch, and dinner on the weekends.  We might have to try it out sometime.