
Day Two involves committing to a diet plan. Two, in fact. The idea is that if your primary diet plan isn't working for you, having already selected a back-up plan prevents any time lost when switching to a new plan. Seems like a smart and easy idea.
My primary diet plan will be the Spark People website. It's free, easy, and I'm already familiar with it. It's basically just calorie/nutrient tracking. Because there's no real eating plan besides staying within calories, I don't plan on modifying it at all.
My back-up diet plan is Weight Watchers. I'd rather not have to rely on WW, but I do know it works and I'm comfortable with it, so I think it's a good choice. At this point, I don't plan on making any modifications to the WW plan. However, I'm not sure if I'd switch to the old 123Success plan, or whatever new plan WW has.
I'm not experiencing any sabotaging thoughts about picking a reasonable, healthy, responsible diet plan.
I did read my Advantages list three times today.
I also listened to a guided meditation that I got from my therapist's office.
Sunday, August 26, 2012

Saturday, August 25, 2012
Beck Diet Solution: Day One
I feel like I'm being a bit redundant here, but once again, I'm going to start working on the Beck Diet Solution as a way to improve my chances at losing weight and keeping it off. The book I'm using is this: Beck Diet Solution, by Judith S. Beck. I also have the Beck Diet Solution Workbook, which is useful and has some information and exercises that aren't in the regular book.
As I work through the plan, I'll post my responses to exercises and my journaling here. So here goes:
Day One
Chapter Three:
Important points from the questionnaire: My motivation to lose weight is low-to-moderate. I'm anxious about this. I have a lot of good reasons to lose weight, and I really want them.. but I feel like I don't really have the desire to make the changes I need to make. Also - I'm an emotional eater (duh). I often eat to comfort myself. I have a lot of resentment about having to deny myself foods that I want. I also have a very hard time tolerating hunger and cravings.
Chapter Four: How to Motivate Myself - or - Reasons I Want to Lose Weight
I don't want to feel deprived, BUT I can modify my plan in advance to include my favorite foods. Besides, I'm either going to deprive myself of some foods, or deprive myself of being thinner. Either way, I experience deprivation.
Completed Tasks for Day One:
Made several copies of my Advantages List. One for my purse, one for the fridge, and one for the computer monitor.
Decided to read my Advantages List first thing in the morning, and right before going to bed.
As I work through the plan, I'll post my responses to exercises and my journaling here. So here goes:
Day One
Chapter Three:
Important points from the questionnaire: My motivation to lose weight is low-to-moderate. I'm anxious about this. I have a lot of good reasons to lose weight, and I really want them.. but I feel like I don't really have the desire to make the changes I need to make. Also - I'm an emotional eater (duh). I often eat to comfort myself. I have a lot of resentment about having to deny myself foods that I want. I also have a very hard time tolerating hunger and cravings.
Chapter Four: How to Motivate Myself - or - Reasons I Want to Lose Weight
- I'll look better and more attractive
- I'll have more confidence
- I'll be able to wear a smaller size.
- I'll fit into more fashionable clothing.
- I'll feel happier when I look in the mirror.
- I'll feel better in a bathing suit.
- I won't feel so self-conscious.
- I'll feel better physically.
- I'll have more stamina.
- I'll have more energy.
- I'll be able to keep up with my kids.
- I'll be less inhibited about my body.
- I'll enjoy physical intimacy more.
- I'll like myself better.
- I'll feel as if I've accomplished something important.
- I'll do more things in public, such as dancing or swimming.
- I'll be more comfortable eating in front of others.
- I'll feel in control.
I don't want to feel deprived, BUT I can modify my plan in advance to include my favorite foods. Besides, I'm either going to deprive myself of some foods, or deprive myself of being thinner. Either way, I experience deprivation.
Completed Tasks for Day One:
Made several copies of my Advantages List. One for my purse, one for the fridge, and one for the computer monitor.
Decided to read my Advantages List first thing in the morning, and right before going to bed.
Friday, August 24, 2012
Framed Family Tree
Some people are so hard to shop for. My mom is one of these people. This year, for her birthday, she asked for two Barbie outfits and a new Lego set so she could play with my kids. Well, that's great, Mom, but I'd like to give you something.
After some thought, I decided to give her a family tree of some sort. I really want to do a tree with both branches and roots, so I could show her parents and grandparents as well as her children and grandchildren, but I couldn't come up with a design I really liked.
So instead, I came up with my own version of this amazing, hand cut family tree that I saw on Etsy. I do not hand cut things, so I spent about two hours coming up with an image in Silhouette Studio. It was a bit of a pain to cut - my blade is a little dull so I used a brand new mat to improve the chances of it cutting well, but then it was really hard to pull off the mat in one piece.
But I think it turned out really well, don't you?
Unframed:

Framed:

Tuesday, July 17, 2012
Rice Krispie Peanut Butter Treats
After Fiona's party, my husband and I were talking about how surprisingly good the 'Rapunzel Paintbrushes' were - just Rice Krispie treats dipped in candy melts. He commented that a really great thing would be somehow combining Rice Krispie treats, peanut butter, and actual chocolate.
Now.. it's not often that my husband comes anywhere close to requesting something from me, so I jumped on the opportunity. I thought through a few variations, then decided on the deliciousness that follows.
You'll need:
Rice Krispie Treats (pre-made or make them from scratch)
Chocolate chips, milk or dark
1 c. peanut butter
1 c. butter, softened
4 c. powdered sugar
3 tbs. milk
I'm sure you could make Rice Krispie treats from scratch, but if you're like me (read: lazy), a much better option is to get the pre-packaged ones from the cookie aisle. Cover a pan with tin foil and lay out your Rice Krispie Treats. Then mold them so there's a hollow in the middle.

Then mix the peanut butter and butter until well blended. Slowly add the powdered sugar, adding in a tablespoon of milk as needed. This peanut butter frosting is seriously the best frosting ever. My grandmother used to make it all the time, and it reminds me of her very much. Sometimes I add a little bit of vanilla, especially if it looks dry. I'm sure you could use cream instead of milk, if you wanted.. I usually use whatever I have the most of (we buy whole for the kids and skim for us).

Once the frosting is made, fill the hollows of the Rice Krispie Treats. I don't have a picture of this, sorry. I used about two tablespoons of frosting per treat. When that's done, melt your chocolate. I prefer to use a double boiler if I have the time, but microwaving the chocolate in 30 second intervals works just fine, too.

Grab your tray of PB frosting filled Rice Krispie Treats and start dipping. It gets a little messy, and they certainly don't have to look perfect. If you want, you could probably put popsicle sticks in them to make it cleaner (and easier to eat, too). If you do that, I'd put the sticks in, then let the Rice Krispie Treats and frosting set in the fridge for a while before dipping in chocolate.

Stick the tray in the fridge and wait for the chocolate to set. Then enjoy!

Monday, June 18, 2012
Tangled Birthday Party: Aftermath
With all the time, energy, and money (well, most of it was done cheaply) I put into Fiona's Tangled birthday party, I wasn't about to just trash everything I had created. Fiona and Niall share the smallest bedroom in our house, a room that we decorated in a knight and fairy princess theme. It only made sense to incorporate the party decorations into their bedroom.
I put the more delicate decorations up on a high shelf that had previously contained some very dusty piggy banks and an old broken toy truck.

On the walls I hung some of the kingdom banners and Flynn Rider wanted posters.

I also strung up some of the dollar store paper lanterns from the ceiling.

The only thing that really took effort was reusing the yarn lanterns. I strung them and a few of the paper lanterns on three lengths of fishing line, then hung them from the ceiling above Fiona's bed.

One of Fiona's gifts was something that my sister and I worked on together. I'd seen something like this on Etsy but didn't want to pay for it, especially since I knew we could do it ourselves. My sister painted the face, and I did the hair. Now all of her clips, headbands, and elastics are neatly organized.

And last but not least: the braids. I just strung these along the windows in her room. It's a pain getting a picture because of the exposure, but you get the idea.


Now every day is a Tangled birthday party in Fiona's room!
**A lot of the items I've mentioned can be purchased through my Etsy store. If there's anything you'd like but don't see, convo me!**
Tangled Birthday Party: Games
Well, I've talked enough about the prep - let's talk about the actual party!
We had several games and activities ready. The idea was to start off reading a Tangled book that we have because I knew several of the party guests weren't familiar with the movie. I didn't want them confused about the other activities (which would seem pretty bizarre if you don't know the significance of frying pans or chameleons). All the kids enjoyed the book, to be honest, and I'm glad I did it. I'd worried it would be something to just rush through, but it was a sweet way to start the party.
After that, we made Pascal Party Blowers, which I found on several sites, but seems to have originated on the Disney Family site. I modified a few things, though. All the foam pieces were cut out ahead of time. Then, following a suggestion I saw on another blog, we used googly eyes instead of foam eyes. We used Glue Dots to stick them on, and also to stick the foam heads together around the party blowers once the kids drew the mouths and eyebrows on. I thought this would be a throwaway activity, but the kids loved it.


We left the table after that so the kids could get up and move around. Our next activity was Pin the Frying Pan on Flynn Rider. This was a lot of fun. I drew a giant Wanted poster and cut out a ton of cardstock frying pans (thank you Silhouette!). We used the ever-helpful Glue Dots to stick them on to the poster.

Once Flynn had been roundly beaten (each kid went at least twice), we went back to the table for another craft activity. This time it was bottle cap necklaces of the kind you find everywhere on Etsy. The kids thought this was a lot of fun, even the boys - I made sure to include a lot of funny images of Flynn, Pascal, Maximus, and the pub thugs. Those necklaces got us some of the cutest pictures from the party: Fiona and some of her friends checking out each other's necklaces.


While some of the kids were taking their time making their necklaces, we entertained the other kids by getting them to do funny poses with the Flynn Rider posters and the pinata. We have some very silly kids around here. But before we knew it, it was getting late and we had to hurry things along. We skipped two of the games - a frying pan relay race with Pascal (and friends), and hide and seek with Pascal. So we smashed open the pinata, which is always a good time. Instead of filling it with a bunch of candy, I filled it with mostly toys - little plastic lizards and horses, Disney Princess rings, princess rubber ducks and pirate rubber ducks, and then a few Blow Pops and Starburst.
Cake and ice cream went by fast as always, and then it was time to pass out the goodies! I'll admit to kind of out-doing myself here. I made Rapunzel braids for all the girls, and felt satchels for the boys. Imagine my dismay when all the girls declared they wanted satchels! I promised them all that I would make them satchels as well, since I overbought felt anyway. They did like the braids, though, really. Everyone also got a set of Rapunzel watercolors.


Everyone seemed to have a great time, and I was so pleased to be able to give my princess the 'perfect' party! The only problem now is.. where to turn my crafting energy?! ;)
**A lot of the items I've mentioned can be purchased through my Etsy store. If there's anything you'd like but don't see, convo me!**
Tangled Birthday Party: Food
Normally, party fare is pretty simple for us. Pizza, fruit, cheese and crackers, veggies, etc. For whatever reason (ahem), we went a little crazy this time. This is where the internet was both a blessing and a curse. It seems that every Tangled party must feature Jello boats, which originated (as far as I can tell) from Paging Supermom! And rightly so, as they're super cute! Here are ours.

Those little sails were a pain to make, but again, my Silhouette came in super handy. The kids really loved the Jello boats, though a word of warning: Jello liquifies in the heat. Keep them cool!
Another cool idea I found (on Pinterest this time) were Rice Krispie treat paintbrushes. The idea is, again, pretty simple: cut Rice Krispie treats into squares. Stick a popsicle stick into them. Dip in different colored candy melts. Ta-da! And if you're especially lazy (like me), you'll get the pre-packaged Rice Krispie treats so you don't have to make them yourself. Again, they were a huge hit!

Of course we needed a cute display, too. Originally I was intending to use this tower for the cupcakes, but 1) I made way too many cupcakes, and 2) the candy melts melted (duh) and I didn't want to clean it up in the middle of the party. The tower is made of three Wilton cake plates, two Pringles cans covered in decorative paper, a wooden birdhouse I painted to look like Rapunzel's tower, a bunch of silk flowers that you can't really see in the picture (they're around the base of each level), and prodigious amounts of hot glue. Oh, and the obligatory braid.
For non-Rapunzel themed food, we served cold cheese tortellini pasta (again, really simple - cheese tortellini, cheese cubes, cherry tomatoes, green onions, and a bottle of Newman's Italian dressing) and cold sesame ginger pasta salad (going with the 'simple' theme - chicken marinated in sesame ginger dressing, bowtie pasta, shredded carrots, green onions, cilantro, and another bottle of sesame ginger dress).

We also served a delicious parmesan artichoke spread that my husband discovered - pretty much equal parts mayo, canned artichokes, and parmesan cheese, blended in a food processor and then baked until hot and melty. We served sliced French and Italian bread to go with it. There was also the customary fruit salad and cheese and crackers, which also had Kingdom Flag toothpicks similar to the Jello Boat sails - unfortunately, I don't think anyone got a picture of those. Most dishes were served in frying pans, of course.

For dessert, we had cupcakes for the kids and a cake for the adults. I thought the cupcakes turned out really well, but I was less than thrilled with the cake. Part of the problem was that I forgot to 'steam' the cake to make the fondant all shiny - it still had powered sugar all over it. However, discussing my mistake with friends did provide me with a few alternate methods of steaming.. previously, I would turn the shower on super hot, open the curtain a crack, and hold the cake as close to the steam as I dared, rotating it as necessary, and hoping and praying it didn't dissolve or I didn't drop it. But like I said, the cupcakes turned out much better. Here's one sitting on top of the fondant sun that topped the cake.

These were a real pain at first. I used the tiniest tip to do the green icing, but it kept clogging. After I while, I realized I had used a different kind of salt than usual and decided that was what was jamming the hole. So I dumped the entire double batch of frosting down the sink and made more - and then it went much more smoothly. I thought that ice cream cone cupcakes would be kind of gross, but I actually thought they were pretty tasty.
**A lot of the items I've mentioned can be purchased through my Etsy store. If there's anything you'd like but don't see, convo me!**

Those little sails were a pain to make, but again, my Silhouette came in super handy. The kids really loved the Jello boats, though a word of warning: Jello liquifies in the heat. Keep them cool!
Another cool idea I found (on Pinterest this time) were Rice Krispie treat paintbrushes. The idea is, again, pretty simple: cut Rice Krispie treats into squares. Stick a popsicle stick into them. Dip in different colored candy melts. Ta-da! And if you're especially lazy (like me), you'll get the pre-packaged Rice Krispie treats so you don't have to make them yourself. Again, they were a huge hit!

Of course we needed a cute display, too. Originally I was intending to use this tower for the cupcakes, but 1) I made way too many cupcakes, and 2) the candy melts melted (duh) and I didn't want to clean it up in the middle of the party. The tower is made of three Wilton cake plates, two Pringles cans covered in decorative paper, a wooden birdhouse I painted to look like Rapunzel's tower, a bunch of silk flowers that you can't really see in the picture (they're around the base of each level), and prodigious amounts of hot glue. Oh, and the obligatory braid.
For non-Rapunzel themed food, we served cold cheese tortellini pasta (again, really simple - cheese tortellini, cheese cubes, cherry tomatoes, green onions, and a bottle of Newman's Italian dressing) and cold sesame ginger pasta salad (going with the 'simple' theme - chicken marinated in sesame ginger dressing, bowtie pasta, shredded carrots, green onions, cilantro, and another bottle of sesame ginger dress).

We also served a delicious parmesan artichoke spread that my husband discovered - pretty much equal parts mayo, canned artichokes, and parmesan cheese, blended in a food processor and then baked until hot and melty. We served sliced French and Italian bread to go with it. There was also the customary fruit salad and cheese and crackers, which also had Kingdom Flag toothpicks similar to the Jello Boat sails - unfortunately, I don't think anyone got a picture of those. Most dishes were served in frying pans, of course.

For dessert, we had cupcakes for the kids and a cake for the adults. I thought the cupcakes turned out really well, but I was less than thrilled with the cake. Part of the problem was that I forgot to 'steam' the cake to make the fondant all shiny - it still had powered sugar all over it. However, discussing my mistake with friends did provide me with a few alternate methods of steaming.. previously, I would turn the shower on super hot, open the curtain a crack, and hold the cake as close to the steam as I dared, rotating it as necessary, and hoping and praying it didn't dissolve or I didn't drop it. But like I said, the cupcakes turned out much better. Here's one sitting on top of the fondant sun that topped the cake.
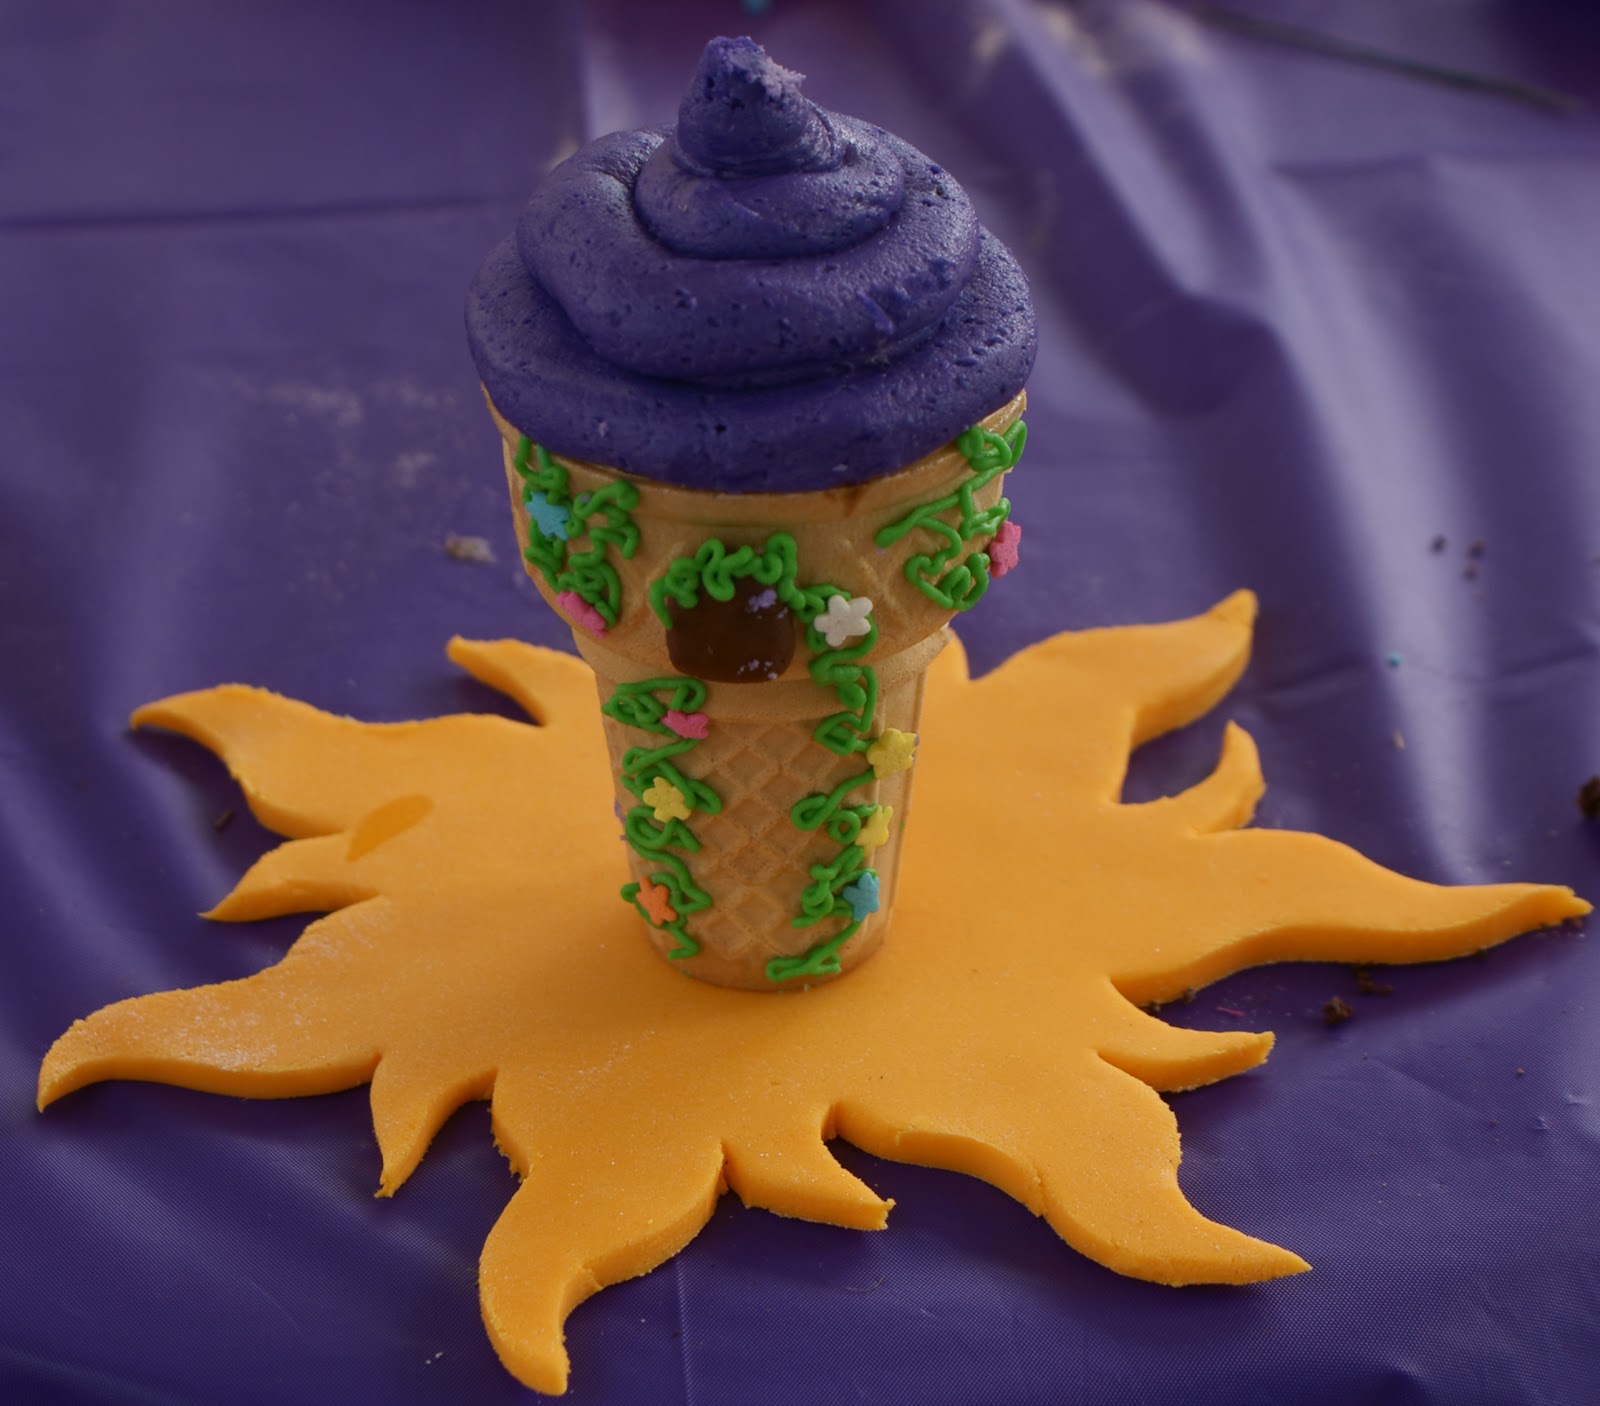
These were a real pain at first. I used the tiniest tip to do the green icing, but it kept clogging. After I while, I realized I had used a different kind of salt than usual and decided that was what was jamming the hole. So I dumped the entire double batch of frosting down the sink and made more - and then it went much more smoothly. I thought that ice cream cone cupcakes would be kind of gross, but I actually thought they were pretty tasty.
**A lot of the items I've mentioned can be purchased through my Etsy store. If there's anything you'd like but don't see, convo me!**
Subscribe to:
Posts (Atom)